


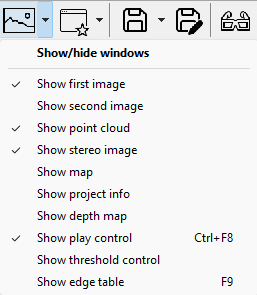
Figure 3.11: Context menu when arrow to the right of the Show/hide window button is clicked.
Left and right image views
3D point cloud view
Stereo image
Map view
Project metadata view
Depth map view
Toolbar
Outlier threshold view
Edge table view

Figure 3.12: A video frame with matched points overlay. The matched points are color coded by distance to viewer. There are no matched points at the bottom of the image because this part does not overlap with the second/right image in a stereo pair.
Show or hide the left and right images of current stereo pair. The images are either frames in a video or still images. By default only the left image is shown. You can overlay matched points on the image with menu View->Show points on video or Ctrl+Shift+P.
You can zoom in and out and translate the images and also refit to the window size as described here.
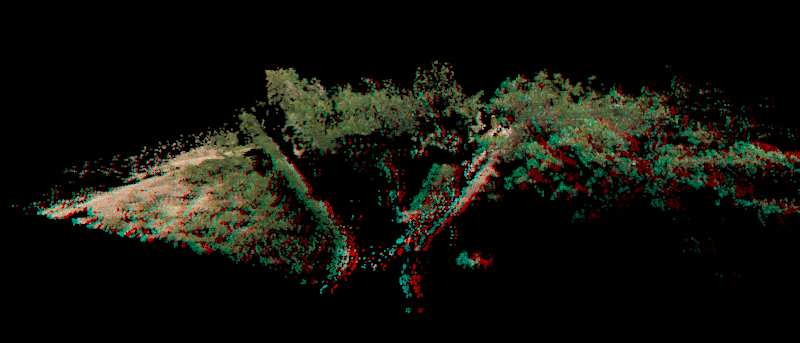
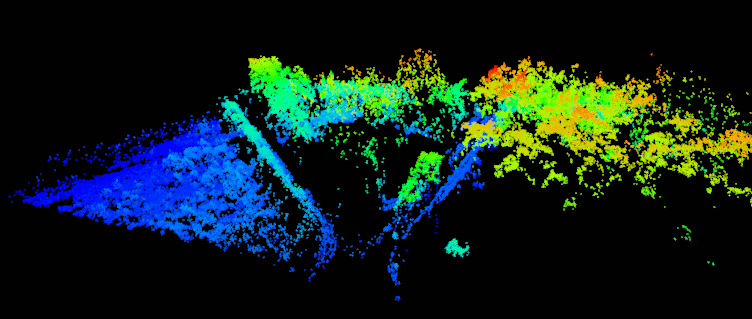
Figure 3.13: 3D point cloud in anaglyph stereo mode and color coded by height.
The generated point cloud is shown in a 3D space. You rotate the 3D space by moving the mouse while holding the left mouse button down. You translate by holding the right mouse button down (or pressing Shift and holding the left button down). You zoom in and out with the mouse wheel.
The point cloud is by default shown in mono mode. You can turn on/off stereo mode (red/cyan anaglyph glasses required) by clicking the glasses button. The context menu next to the glasses button has an option Stereo->Stereo mode..., which opens a dialog where you can change the stereo effect. You can increase or decrease the stereo effect by choosing a higher or lower number than the default stereo amount 10.
You can color code the point cloud by height instead of the default RGB values from images by selecting View->RGB point cloud or Ctrl+F7. This mode is best viewed without stereo viewing, i.e. with stereo amount equal to zero.

Figure 3.14: Stereo anaglyph image.
The stereo image view allows you to view a 2D video in 3D stereo with red/cyan anaglyph glasses. The stereo images are generated by real time epipolar resampling of the left and right images. Compared to the stereo mode viewing of point clouds you get a more detailed photographic 3D view, but you can not navigate in the stereo image. Compared to a single image, your ability to interpret the scene is greatly enhanced in a stereo image.
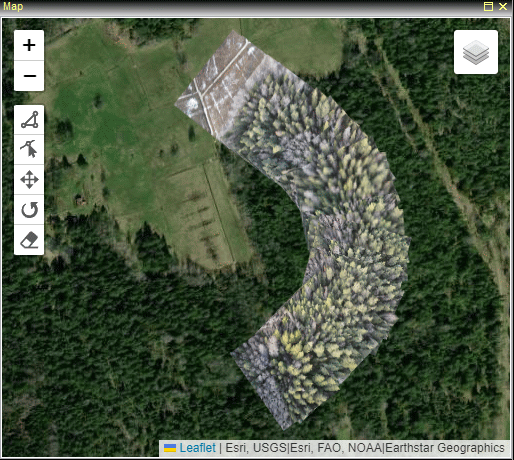
Figure 3.15: Image footprint overlay on an ortho image map view.
The map view can be toggled on/off with the Map button  in the toolbar or through the context menu attached to the Show/hide windows button or the menu View->Windows->Show map.
If there are metadata for interior and exterior orientation elements, the map view will be displayed by default and a trajectory of the project is drawn when project is loaded.
Thumbnails footprints are added to the map while processing if there are metadata supporting it.
Within the map view you can choose to show a map, a terrain map or an orthophoto image layer with the button at the top right.
Hold the mouse left button down to move around in the map and zoom in or out with the mouse scroll wheel.
The map view will be centered around the last added images while processing.

Figure 3.16: Metadata, such as still image EXIF tags, for an image.
Metadata are extracted from image while processing. If possible they are used to georeference the images, e.g. to show their footprints on the map.
The project metadata view can be toggled with the metadata button  .
The view shows parameters for each of the two images in a summarizing a tree with all extracted parameters.
.
The view shows parameters for each of the two images in a summarizing a tree with all extracted parameters.
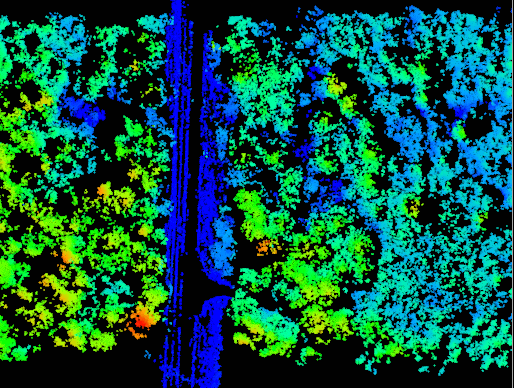
Figure 3.17: Orthographic 2D depth map.
The depth map shows a color coded 2D orthographic view.
Known issue: You may need to refresh the depth view by e.g. undocking and redocking the pane when shown the first time.

Figure 3.18: Toolbar
You can show or hide the toolbar with Ctrl+F8 or through the context menu next to the show/hide window button or View->Windows->Show toolbar.
You can grab the left part of the toolbar to make it floating, i.e. undocked from the mainframe. This increases the viewing area for the remaining docked views. To get the largest possible view of e.g. the 3D point cloud you can drag the toolbar to a second display, if available, and turn off borders and turn on fullscreen mode.
The outlier threshold control is a slider which removes the statistically least reliable points.
Known issue: Works only in bundle block view
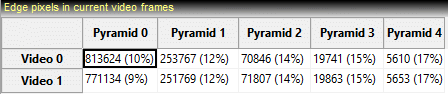
Figure 3.19: Number of extracted edge pixels per image and pyramid level
This view show statistics on how many edge that were extracted in each image and pyramid level. It is of very low importance, but may be used to verify that a reasonable amount of points are extracted if a process fails.